
I have heard numerous people talk about a function in Cubase called Expression Maps. I never really understood what it was and never took the time to learn it until now. And wow, I am amazed.
Everybody that works with virtual instruments and Kontakt libraries probably knows about key switching. Key switching allows you to switch articulations by using midi notes stuffed at the upper or lower end of your midi keyboard. It seems like a great idea when performing live, but there is a dark side to key switches. When you record them in your midi clip you will have to insert them slightly before the note you want to be effected.
The problem with key switching
Oké fine, no big deal. The big problem, however, is that the play head or cursor has to pass this midi note in order for it to be activated and it will stay activated until you play another key switch. Now if you want to edit, let’s say a legato passage, but you haven’t passed that key switch yet you’re instrument will still be playing the last passed key switch which may be pizzicato, staccato or whatever.
This really annoyed me after a while, especially when you have multiple instruments using lots of key switches. It works great when playing chronologically in order but we seldom work like that when writing or editing a piece of music. Some people stopped using key switches all together for this reason and began to use one articulation per instrument. So if you have an instrument with 10 articulations, you will need to create 10 instrument tracks each with their own Kontakt instance. Imagine the track count you would end up at and the processing power required. Luckily Steinberg realized this problem and figured out a solution called: expression maps.
What are expression maps?
So what exactly is an expression map? It is basically an improved version of key switching. You can map all your existing key switches in the expression map setup and label them accordingly. Those articulations can now be found in the Articulations/Dynamics controller lane inside the key editor. Now you can simply draw a bar of the articulation you want and it will play until the end of the clip.
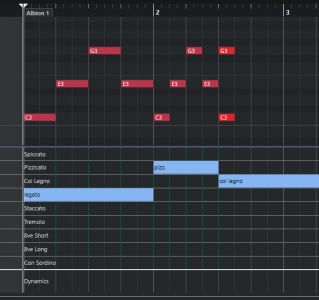
The benefit of this is that you don’t have to pass a midi note trigger in order for the articulation to be switched. You can start anywhere you want as long as the expression map is active and it will play. You can easily switch between articulations because everything is labeled and you don’t have to remember which key is switching what articulation for a certain instrument anymore.
Setup
The only drawback to Expression Maps is that you have to set it up. Some library developers may offer ready-made expression maps for you to download but most of the time you’ll have to roll your own.
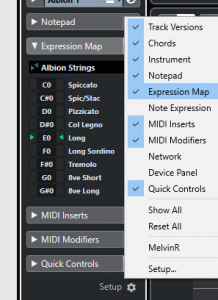
To do this, first, go to the expression map tab in the inspector on the left. If you don’t see the expression map tab, go to the setup at the bottom and activate it.
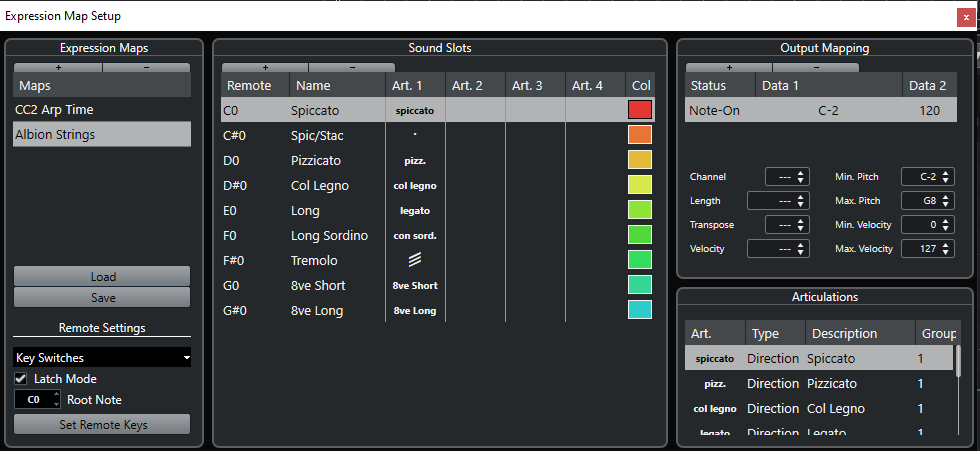
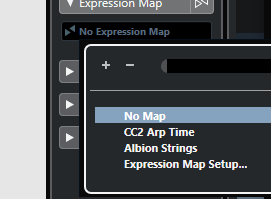
Now click on ‘Expression Map Setup’ and a new window opens.
Create a new expression map by clicking on the + in the upper left part of the window. Now you’ll have to map your key switches to expression maps in the middle window. Give them a name and click on the + in the ‘Output Mapping’ part of the window. Here you have to map it to a note-on message.

The last step is to select an articulation or to create your own by clicking in the ‘Art.1’ column and choosing ‘Add Custom Articulation’ at the bottom of the list. Now a new item appears in the Articulations section in the bottom-right corner of the window where you can assign a symbol or a custom name. Also make sure to switch the type to ‘Direction’ as this will affect multiple notes, while ‘Attribute’ only affects one note at a time.
But wait, there’s more!
Now you don’t have to limit yourself to key switches. A very powerful feature is that you can assign expression maps to CC values as well! This means that you can automate parts of a virtual instrument or synthesizer by assigning expression map data. But why would you use this if you can just draw in automation curves?
Some synthesizers or virtual instruments provide parameters that are stepped, like a clocked delay time or an arpeggiator speed function. If you would use traditional automation then it takes some guessing to figure out where that automation that 8th note delay is hiding at. There is also no point in having smooth transitions because the parameters are stepped anyway. Editing becomes a whole lot of trouble now too.
Expression mapping time
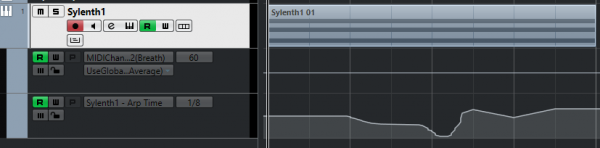
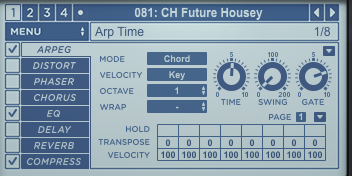
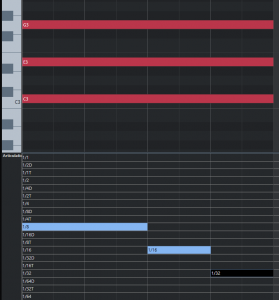
In order to be able to control stepped parameters with expression maps, we’ll have to first figure out the number of expression maps we need to make. I wanted to control the arpeggiator time from Sylenth1 which divides the time parameter into 19 steps ranging from 1/1 to 1/64 with dotted and triplet values in between.
Since midi CC data can have a value between 0 and 127, I divided 128 by 19 to get about 7 rounded up. This means that for every step starting from CC value 0 we’ll have to add 7.

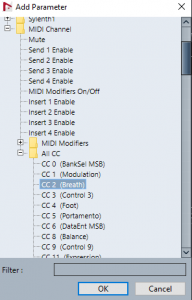
In the output mapping section, instead of selecting a note-on message, we change this to ‘Controller’. In the ‘Data 1’ column we choose the CC number. Sylenth1 has some CC values pre-assigned so I choose CC2 which wasn’t assigned to anything yet.
The only thing that’s left to do is to midi learn the parameter you want to control. This is easy if you have a midi controller with different knobs and faders, but if you don’t have one you can do it by creating a new automation lane, clicking on ‘more’, and choosing the CC value you want.
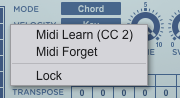
Now draw in some automation, click on learn in Sylenth1 and the parameter is mapped. If you save the preset in Sylenth1 the mapping is remembered. But you can of course also right-click on the instrument track in Cubase and save a track preset.
I never thought Expression Maps would be so useful. Of course, it takes a while to set up but just like setting up a template project, you only need to do this once. Just remember to backup your presets once in a while.
Check out this great tutorial by Steinberg about using Expression Maps. Or check out the Cubase manual about Expression Maps.


One Response
Hi Melvin,
thanks for your article!
Sometimes Cubase is really annoying in generating Expresion Maps, so I created an Online Expression Map Generator.
Maybe this helps a little bit in being more efficient:
Have a look at http://mykomedia.de/ExpressionMapGenerator/
Kind regards,
Alex