
Now that you know a little bit about effects and how to use them, it’s time for some practical information on where to place them. Yes, there’s actually more than one position to put your effects. One is called an insert effect and the other is called a send effect also known as aux (auxiliary). What is the difference between inserts and send effects?
Insert Effects
The name insert comes from analog mixers. An effect is basically inserted into the signal path. Let’s look at the signal flow of a mixer for a second:
Input > Gain > Insert > EQ > Fader
A signal enters the input and after you set the pre-amplifier gain, the signal goes out of the mixer through a cable to the input of a compressor, distortion, or any other effect for that matter. The signal is being processed through the external gear and the output is fed back to the mixer’s insert input. The signal thus travels completely through the insert effect. If there is no insert cable connected, the insert is just bypassed and the signal immediately continues to the EQ.

Now, some mixers may have a different signal chain. In the example above the insert is positioned before the volume fader. This is also called Pre-Fader. In this case, the fader level has no effect on the signal that enters the effect. The gain however does affect the input level because it is the first step in the signal chain.
Some mixers allow you to place inserts after the fader, which is called Post-Fader. In this case, the fader level does affect the signal level going to the effect. So if you use compression in this case, a higher fader level will result in more compression being applied because of the higher input level.
Send Effects
Insert effects can be considered in series. The signal follows one possible path. Send FX or auxiliaries however are used in parallel. This means the signal is split at one point in the signal chain and one part of the signal is ‘send’ to the effect, while the other part of the signal continues down the signal chain as normal. The signal flow looks like this:
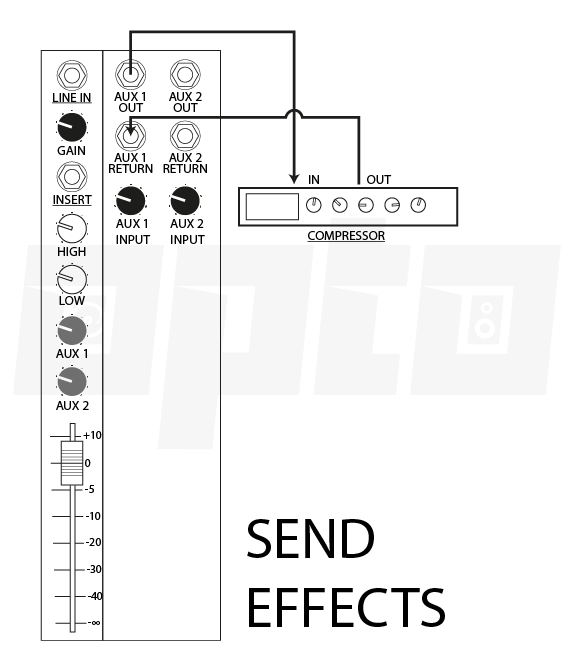
The signal goes out of the channel via a volume control called: auxiliary send. This signal determines the input level to the effect, usually a reverb or delay. The output of the effect is then returned not to the original mixer channel but to an entirely separate input channel often called the effect return or aux return in another part of the mixer.
The benefit of this method is that you can now blend the amount of effect with the original dry signal either by changing the send level or by changing the return level. Because the return channel is separate from the dry signal you can put additional insert effects on this return channel such as EQ and compression. In this case, you can remove the high end from a reverb return without altering the high end of the dry signal.
When do you use inserts?
Inserts are for effects that need to be used 100% wet. Effects like EQ, compression, gates, de-essers, and saturation. Usually, more technical sound-shaping tools are used as insert effects. Inserts are used on one channel or group only.
When do you use sends?
Sends are for effects that require a mix to be made between the dry and wet signals. Effects such as reverb, delay, chorus, phaser, and flanger. Multiple channels can be ‘send’ to these effects at once, with the individual send levels determining the dry/wet mix.
Compression and distortion can be used as send effects too! This results in parallel compression and parallel distortion. This is great if you want to blend a little bit of a totally smashed and distorted signal in with the dry signal. The benefit of this method is that you will preserve transients but add a little bit of color and sustain.
Do I need to use send effects in my DAW?
In the real world, studios may only have one or two reverb or delay units, which requires the use of send effects to apply these effects to multiple channels. With modern DAW’s you can insert as many reverb plugins as you want. I would still advise you to use send effects, however. Not only does this save CPU power but also is it easier to blend different instruments together by using only one reverb.
Another benefit of send effects is that you can automate the send level. If you slowly increase the send level in a buildup for example and then completely turn off the send level, the delay or reverb will still decay. If you turn of the wet/dry mix on a insert effect, the delay or reverb’s sound is cut out entirely when you turn down the mix level.
So the only time I would use reverb and delay on inserts is if I would want to process both the wet and dry signal at once. I also might want to add compression to blend the reverb with the dry signal or add some distortion to create a huge sounding reverb effect. I do use chorus, flanger, phaser, and other effects on insert channels in my DAW because I usually only use it on one or two instruments at max anyways.
That’s it! A primer on insert v.s. send effects. Go try it out for yourself and see what works for you. If you have any questions feel free to contact me or leave a comment down below.